Tuesday, November 30, 2010

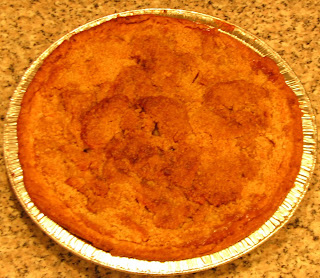
Apple Pie

Last weekend was Thanksgiving weekend, so I decided to make an apple pie. I had never tasted a pie until a friend got one for thanksgiving last year. I loved it, and it didn't seem much difficult to make! Later I got the frozen pie crusts from Trader Joe's and had made the apple pie once. It was delicious, especially when it was freshly baked, but after a couple of days I did not enjoy it that much. The reason was the base was not baked as nicely as the rest of the crust. So I did more research this time and the result was superb. In fact, this time the pie tasted better with more time!! Here I am sharing the recipe and few tips.


Ingredients

  • One 9" Pie crust
  • 5 Apples
  • 1 tsp Cinnamon Powder
  • 1/4 Tsp Nutmeg Powder
  • 3 Tbsp All-purpose flour
  • 3 Tsp butter
  • 1 Cup Brown Sugar

Method
  1. Thaw the frozen pie crust completely for about an hour.
  2. In the mean time, mix in 2 Tbsp sugar with the flour, and cut in butter until the mixture becomes crumbly.
  3. Peel, core and cut apples into thin slices.
  4. Arrange the pie crust in about 1-inch deep pie dish. Fit it properly inside the dish, and press the edge of the crust over the slanted surface of pie dish.
  5. Preheat the oven at 400 degrees F.
  6. Arrange the apple slices in the pie crust. Sprinkle remaining sugar, cinnamon powder and nutmeg powder over the apples.
  7. Spread the crumbs over this evenly.
  8. Put the pie dish in a bigger baking sheet and bake in the oven for 35 minutes.
  9. Check with a knife if the pie is done, or bake for few more minutes. Let it cool for one hour and serve.


Tips

  • The fruits and sugar make the base soggy. To bake the base properly, prick the base of the crust with a fork. Also, I baked the pie at 400F for first 20 minutes, and at 350 for next 20 minutes.
  • If you like sprinkle some sugar between layers of apple slices instead of adding all in the end.
  • The cinnamon & nutmeg powder give a fragrant aroma to the pie. Vary the quantity according to your taste. Also, add a pinch of cinnamon + nutmeg powder in the crumbs.
  • You could use white sugar in this recipe, but I tried it with brown sugar this time and I liked it more.

Wednesday, November 3, 2010

Lanterns

Diwali is almost here, and I have become too busy with work at office. So I had finished preparing all the recipes over the weekend. But the name caught my attention. I heard about this recipe, and wanted to try it out for Diwali. The recipe is quite simple, yet attractive! So after coming home, I made preparations and just finished preparing it. It's still hot as I am writing this! It's a great snack item and should go well with tea. So here is the recipe. I tried it with small proportions, so give it a try. It a great item, and one can't resist munching one after another!


Ingredients
  • 1/2 cup coarse semolina /rawa (don't take the fine one)
  • 1/2 cup all-purpose flour maida
  • 2 tsp finely chopped cilantro
  • 2 tsp finely chopped curry leaves
  • 2 Green chilies finely chopped
  • 1/2 tsp Ajwain/ Ajowan caraway/ carom seeds
  • 1/2 tsp Cumin seeds
  • 1 tsp sesame seeds
  • 2 tsp dessicated coconut
  • Salt to taste
  • 2 tsp ghee
  • Oil for frying

Method
  1. Heat ghee and mix well in the semolina. Add in other ingredients and make a dough using warm water. The dough should not be too thick, we want to roll it into really thin disc later.
  2. Knead well, and set this dough aside for at least 15-20 minutes.
  3. Divide the dough into 2-3 parts.
  4. Take one of it at a time and knead very well. Roll it into a very thin disc. Cut the rolled out dough to make rectangles (about 1.5" X 2" in size) in it. Make 3-4 parallel vertical lines with a cutter inside the rectangles as we do to make lanterns.
  5. Pick up a rectangle and fold it to shape it like a lantern. Bring the edges together and apply little pressure to join them.Make remaining lanterns similarly.
  6. In a pan, take some oil and on medium flame fry these lanterns till they are golden brown.
Tips
  1. The cilantro, curry leaves and green chilies give this a very nice look, and the sesame seeds give great taste.
  2. I guess the shapes would have been better if the cuts had been parallel to the height and not the width, so next time I am going to try it that way.