Tuesday, November 30, 2010

Apple Pie

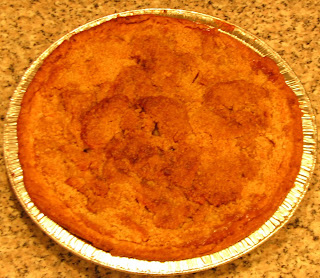
Last weekend was Thanksgiving weekend, so I decided to make an apple pie. I had never tasted a pie until a friend got one for thanksgiving last year. I loved it, and it didn't seem much difficult to make! Later I got the frozen pie crusts from Trader Joe's and had made the apple pie once. It was delicious, especially when it was freshly baked, but after a couple of days I did not enjoy it that much. The reason was the base was not baked as nicely as the rest of the crust. So I did more research this time and the result was superb. In fact, this time the pie tasted better with more time!! Here I am sharing the recipe and few tips.


Ingredients

  • One 9" Pie crust
  • 5 Apples
  • 1 tsp Cinnamon Powder
  • 1/4 Tsp Nutmeg Powder
  • 3 Tbsp All-purpose flour
  • 3 Tsp butter
  • 1 Cup Brown Sugar

Method
  1. Thaw the frozen pie crust completely for about an hour.
  2. In the mean time, mix in 2 Tbsp sugar with the flour, and cut in butter until the mixture becomes crumbly.
  3. Peel, core and cut apples into thin slices.
  4. Arrange the pie crust in about 1-inch deep pie dish. Fit it properly inside the dish, and press the edge of the crust over the slanted surface of pie dish.
  5. Preheat the oven at 400 degrees F.
  6. Arrange the apple slices in the pie crust. Sprinkle remaining sugar, cinnamon powder and nutmeg powder over the apples.
  7. Spread the crumbs over this evenly.
  8. Put the pie dish in a bigger baking sheet and bake in the oven for 35 minutes.
  9. Check with a knife if the pie is done, or bake for few more minutes. Let it cool for one hour and serve.


Tips

  • The fruits and sugar make the base soggy. To bake the base properly, prick the base of the crust with a fork. Also, I baked the pie at 400F for first 20 minutes, and at 350 for next 20 minutes.
  • If you like sprinkle some sugar between layers of apple slices instead of adding all in the end.
  • The cinnamon & nutmeg powder give a fragrant aroma to the pie. Vary the quantity according to your taste. Also, add a pinch of cinnamon + nutmeg powder in the crumbs.
  • You could use white sugar in this recipe, but I tried it with brown sugar this time and I liked it more.

Wednesday, November 3, 2010

Lanterns

Diwali is almost here, and I have become too busy with work at office. So I had finished preparing all the recipes over the weekend. But the name caught my attention. I heard about this recipe, and wanted to try it out for Diwali. The recipe is quite simple, yet attractive! So after coming home, I made preparations and just finished preparing it. It's still hot as I am writing this! It's a great snack item and should go well with tea. So here is the recipe. I tried it with small proportions, so give it a try. It a great item, and one can't resist munching one after another!


Ingredients
  • 1/2 cup coarse semolina /rawa (don't take the fine one)
  • 1/2 cup all-purpose flour maida
  • 2 tsp finely chopped cilantro
  • 2 tsp finely chopped curry leaves
  • 2 Green chilies finely chopped
  • 1/2 tsp Ajwain/ Ajowan caraway/ carom seeds
  • 1/2 tsp Cumin seeds
  • 1 tsp sesame seeds
  • 2 tsp dessicated coconut
  • Salt to taste
  • 2 tsp ghee
  • Oil for frying

Method
  1. Heat ghee and mix well in the semolina. Add in other ingredients and make a dough using warm water. The dough should not be too thick, we want to roll it into really thin disc later.
  2. Knead well, and set this dough aside for at least 15-20 minutes.
  3. Divide the dough into 2-3 parts.
  4. Take one of it at a time and knead very well. Roll it into a very thin disc. Cut the rolled out dough to make rectangles (about 1.5" X 2" in size) in it. Make 3-4 parallel vertical lines with a cutter inside the rectangles as we do to make lanterns.
  5. Pick up a rectangle and fold it to shape it like a lantern. Bring the edges together and apply little pressure to join them.Make remaining lanterns similarly.
  6. In a pan, take some oil and on medium flame fry these lanterns till they are golden brown.
Tips
  1. The cilantro, curry leaves and green chilies give this a very nice look, and the sesame seeds give great taste.
  2. I guess the shapes would have been better if the cuts had been parallel to the height and not the width, so next time I am going to try it that way.

Sunday, October 31, 2010

Saran Ki Pudi / Puri

I don't know what this is called in Marathi. I know very few ladies who make this Saran ki Pudi for Diwali faraal, but I do know lot of them who like it! It's a modified version of Karanji, or perhaps Karanji is modified version of this. It has jaggery instead of sugar. I love jaggery, so I prefer putting it instead of sugar in dishes like puran poli, kharvas and anarsa.

The filling is called 'saran' (सारण) and after stuffing it, it's fried like puri. I usually prepare the filling for karanji and this, and then make both the dishes together. This filling can be stored in an airtight container for a week or so. Shaping this is easier than karanji though.


Ingredients

For filling

  • 2 cups Semolina1/2 cup Dessicated coconut
  • 1 1/2 cups Jaggery
  • Cardamom powder
  • 3 tsp ghee
  • Ghee/ oil for frying
  • 1/2 cup milk

Method
  1. In a pan, add 2 tsp ghee. Heat on medium flame. When ghee melts, add Semolina.
  2. Fry until it's golden brown in color. Then add coconut to it. Take off the heat.
  3. In another pan, take 1 tsp ghee. Heat on medium flame. When ghee melts, add jaggery.
  4. When jaggery melts, add the mixture of semolina and coconut, and mix it well in the jaggery quickly. Let it cool.
  5. As we want an even mixture, take this mixture in a mixie and grind. We don't need a fine powder, but a coarse and even mixture. Keep it aside.
  6. Prepare the dough same as we prepare for karanji. Set this dough aside for 15-20 minutes. Keep it covered with a damp cloth.
  7. Sprinkle some milk on the filling and mix it well. It should be slightly moist so that it holds well inside the puri.
  8. Take 1 inch ball from the dough. Roll it to make a thin disc.
  9. Now sprinkle some maida on a flat surface and put this disc on it.
  10. Take 2-3 tsp mixture and spread it over the disc leaving the edge. Leave about 1/2 to 3/4 inch margin near the edge. The mixture should be spread evenly and could be about 3 mm thick layer.
  11. Take another 1 inch ball from the dough. Roll out one more thin disc. Put it over the other disc covering the mixture, and bringing the edges over each other.
  12. Now seal the edges carefully. Make sure there are no air bubbles, so as you go on sealing the edges, try to remove the air between the disc and the mixture below it. We need to apply some pressure so that the edges are sealed properly, so it's important to have enough maida sprinkled below the 1st disc. Otherwise it might stick to the the surface.
  13. Cut off the remaining dough with karanji cutter. Be careful while doing this to make sure the edges won't open up.
  14. Put this puri on a paper and keep it covered.
  15. Make remaining puris one by one. Keep the dough covered while making puri's.
  16. Heat ghee/ oil on medium heat. Deep fry these puris by one. You can serve hot or store in a container.
Note
Adding milk to the mixture and keeping it for long time might also form lumps in the mixture. You'll need to grind the mixture again in that case. To avoid this, don't add the milk to all the mixture at once. Keep the powder ready, take some of it (enough for 5-6 puris) at a time and add milk.
Karanji

I am back with one more faral item, my favorite, Karanji। Last week, I saw a poll about favorite faral item and the author had not listed Karanji in the options!! I was quite pissed off, so decided not to vote ;) Jokes apart, but I just love karanji, and I manage to make at least a few of these every Diwali no matter how busy I am. You can find many version easily on the web, but the recipe I am going to share is my mom's. The filling is very soft and these are more whitish than reddish/ brown. While making karanjis I always remember this poem I had learned in preschool.

गोरी पान करंजी नावेसारखी दिसते,
पोटातले खाताच आणखी खावी वाटते!


So, here goes the recipe.

Ingredients

For filling
  • 2 cups dessicated coconut
  • 1/2 cup Semolina/ Rava/ Suji
  • 1 1/2 cup powdered sugar
  • 1 tsp ghee
  • 1/4 - 1/2 tsp poppy seeds
  • Cardamom powder

For dough
  • 1 cup all-purpose flour / Maida
  • 1 tsp ghee
  • 1/4 cup milk
  • water
  • Oil/ ghee for frying


Method:
  1. In a pan, add 1 tsp ghee. Heat on medium flame. When ghee melts, add Semolina.
  2. Fry until it's golden brown in color. Add poppy seeds to it. Fry for a minute.
  3. Turn heat off. Add dessicated coconut to this, and mix well.
  4. Add powdered sugar and cardamom powder. The feeling is ready.
  5. For the dough, take maida in a bowl. Heat the ghee, and add to the maida. Add the milk and mix well. Add water to this to make a thick dough.
  6. Knead well, and set this dough aside for 15-20 minutes. Keep it covered with a damp cloth.
  7. To make karanji, take 1 inch ball of the dough. Roll it to make a thin disc.
  8. Put the filling at the center of one half of the disc leaving the edge. Then cover it with the other half bringing the edges over each other. Seal the edges properly so that the mixture doesn't come out. Make sure there is no air inside the sealing.
  9. With karanji cutter, cut off the excessive part of the edges. Be careful while doing so as if you cut very close the filling the karanji would open up. (If you don't have a cutter, just twist the edges. )
  10. Keep this karanji in a plate or on paper and cover with damp cloth to make sure that it doesn't harden while you are making the remaining karanjis.
  11. Make all remaining karanjis in the same way and keep them covered. Don't forget to keep your dough covered.
  12. Heat ghee/ oil on medium heat. Deep fry karanjis one by one. You can serve hot or store in a container.
Tip
Adjust the sugar to your taste. I add some extra sugar so that it goes well with the covering.

Note
Since this filling contains more of the coconut, it doesn't last long. It's good for about 4-5 days (depending on temperature).


Wednesday, October 27, 2010

Anarsa


Diwali is just a few days away, and it's time for some nice faraal. We get almost everything in the Indian stores. But karanji and aransa's are something that we can't get. So I have been making these two for every Diwali. Since anarsa's take lot of time, I started it well in advance this time. I am sharing it here today. For the first-timers it is not straight forward, but definitely worth a try. If you succeed once, you would definitely make this every year!!


To Make the dough

Ingredients:
  • 1 cup rice
  • 3/4 cup jaggery (finely grated)
  • Water

Method:
  1. Wash rice two to three times. Soak it in the water for three days. Change water everyday.
  2. After three days, drain water completely. Put the rice in collander to drain any remaining water. Leave if for about 10-15 minutes.
  3. Spread a clean cotton cloth on a plain surface, and spread rice on it evenly. The cloth will absorb remaining water.
  4. Take half cup of rice in a mixie at a time, and grind it to fine powder. Repeat this for remaining rice.
  5. Sieve this to get fine powder.
  6. In a bowl, mix rice powder and grated jaggery. Mix it well to form a nice mixture of rice powder and jaggery. Knead well to make a dough. If you are not able to make the dough right away, just store the mixture in a container at room temperature.
  7. Keep it for 3 to 4 days. In cold weather it may take more days to get the dough as desired.
  8. Once the dough is ready, you can store it in the refrigerator for 6 months or so.

To Fry

Ingredients:
  • Ghee
  • Poppy seeds
  • The dough

Method:
  1. Take some dough and let it come to room temperature.
  2. Knead it with some ghee. If it's too dry add very little amount of milk.
  3. Make about 1 inch balls of the dough. Take poppy seeds on a flat surface.
  4. Put one ball in the poppy seeds. Apply some ghee on your finger tips, and flatten the dough to form a circular disk of anarsa. The anarsa should be about 3-5 mm thick depending on how crispy you want it.
  5. Heat a wok on medium heat, and add some ghee. The amount of ghee should be such that the top of anarsa is not covered it. Now put in the anarsa with the poppy seeds on top. With a spoon, sprinkle ghee over anarsa from all sides. Make sure it's done in the center. All this needs to be done quickly without letting the anarsa burn.
  6. Remove the anarsa from ghee and serve hot.

Tips:
  1. For step 4 of dough, I prefer to stop the mixie and blend the rice after every few seconds. I repeat this 3-4 times than doing this in one go.
  2. The anarsa's may splutter if there is more jaggery in the mixture. For this reason, I usually make some extra powder so that we can add it to the dough.
  3. For more sweetness you can add powdered sugar while frying the anarsas.

Sunday, March 7, 2010

Punjabi Masala

Most of the punjabi dishes require various spices, and it's quite time consuming to start from scratch. So I usually have this masala ready to add to the recipes. The name came from the one & only cooking class I took long back. They used only 4 ingredients; I have added many more over the time, and here is my version of it.

Ingredients
  • Cloves - 5
  • Green Cardamom - 3
  • Cinnamon Stick - 3/4"
  • Black Pepper seeds - 4
(Optional)
  • Bay leaf - 1
  • Coriander seeds - 1 tsp
  • Caraway seeds - 1/4 tsp
  • Cumin seeds - 1/2 tsp
  • Nutmeg (coarsely crushed) - 1/4 tsp
  • Carom seeds - 1/4 tsp
  • Black Cardamom - 1

Method
  • In a kadhai (wok), take all the spices.
  • Add more spices if you want, and adjust the quantity according to your taste.
  • Roast them on a medium flame for 5-7 minutes or until it starts giving nice aroma.
  • Take off the flame.
  • Grind it in a mixie to make a powder. The masala is ready to use.

Note
Many pulav recipes require adding these spices, and some people may not like those big pieces of cinnamon sticks or whole cardamoms. In that case you can add this masala instead.

Shahi Paneer

Ideally Shahi Paneer recipe should have been my first post. I make it quite often. My nephew, who doesn't like to eat roti otherwise, loves this. It is a recipe I can rely on for potlucks!


Ingredients
  • 250 gms. paneer (cottage cheese)
  • 3 tsp. oil or butter
  • 1 onion chopped into strips
  • 3 tomatoes chopped
  • 1/4" piece ginger chopped
  • 2 green chillies chopped (optional)
  • 1/2 tsp. punjabi masala
  • 1/4 cup beaten yogurt
  • 1 tsp. red chilly powder
  • 1 tsp. coriander powder
  • 1/2 tsp. cumin powder
  • 1/2 tsp. garam masala
  • 1/2 tsp. sugar (optional)
  • salt to taste
  • 1/4 cup milk
  • 2 tbsp. tomato sauce
For Garnishing
  • 2 tbsp. grated paneer
  • 1 tbsp. chopped coriander

Method
  • Chop the paneer into 1" fingers.
  • Heat half the oil. Add onion, ginger, green chillies and punjabi masala. Fry for 3-4 minutes.
  • Add tomatoes. Cook for 8-10 minutes, covered.
  • Add 1/4 cup water and cool.
  • Blend in a mixie till smooth.
  • Heat remaining oil, add gravy and other ingredients except yogurt, milk and paneer.
  • Add yogurt and cook for 5 minutes.
  • Boil to get a nice thick gravy.
  • Just before serving, heat gravy, add milk and paneer and boil for 2-3 minutes.
  • Garnish with chopped coriander and grated paneer.

Notes
  • If you want more brown/red color for the gravy, you can add more red chilly powder/ garam masala and skip green chillies.
  • On the other hand, if you want a lighter color, you can add more yogurt and milk.
  • The gravy prepared 2-3 hours in advance tastes yummier.